First Things First...
Before jumping into VR lessons, you'll need to purchase a Meta Quest 3 or a Meta Quest 2 VR headset.
Purchase a Meta Quest 3:
Purchase a Meta Quest 2:
Meta Quest 3 Headset

Meta Quest 2 Headset
VR Setup Instructions

Step 01
Learn how to set up a Meta account. A Meta account is required to use a Meta Quest 2 or 3 headset.
Step 02
Learn how to connect your headset to Wi-Fi and pair the headset to the Meta Quest app.

Step 04 (optional)
Learn how to stream your VR experience onto a phone, laptop, or TV so others can observe.
Virtual Electrical Training (VET) App Instructions
Step 01
Learn how to select and launch a VET lesson on your learning management system.
Step 02
Learn how to start the VET lesson on the headset, complete the course, and submit your results.

Step 03
Learn how to view submitted VET results on your learning management system.
Frequently Asked Questions
VR & HEADSET QUESTIONS
I'm new to virtual reality (VR), what is VR and where do I begin?
Not to fear! VR is an exciting new technology, but it’s natural for newcomers to have questions. To start, you should know the definition of virtual reality (VR): it’s a simulated, 3D environment that can be interacted with in a seemingly real, physical way by a person using a helmet with a screen inside. The main thing to remember is that VR is interactive and 3D. Unlike watching a movie, in VR you’re immersed in a 3D environment where you are actively involved. Most people today think virtual reality is “just for games”, but we believe the future of VR also lies in the teaching field. Many large corporations – including Walmart, the Bank of America, MGM, FedEx, and Verizon – have already adopted VR training for their employees. The trend is expected to continue as more companies and schools learn about the unique and exciting benefits of VR.
Ready to jump in and try VR for yourself? Our apps are available on the Meta Quest 2 headset, which you can buy here, or on the new Meta Quest 3 headset, which you can buy here. Setting up the Meta Quest 2 is easy. Once you put on the headset, a tutorial will walk you through everything step-by-step. Since you’re new to VR, we recommend starting out with 15 minutes of VR screentime per day and slowly increasing it. After that, enjoy, and welcome to VR!
I get motion sickness easily. Will I be able to go through VR?
While VET users usually don’t experience motion sickness with the app, there are some precautions you can take:
- When walking around in the virtual environment, take your time. Slow, steady movements will help your body adjust and combat any screen lagging due to quick movements.
Limit your initial time spent in VR, with the goal of increasing as time goes on. If possible, start with 15 minutes for your first few VR experiences. Aim to increase that range by 5 minutes every few days and continue building on that range until you feel completely comfortable in the VR.
- Set up a fan to blow air on you while in VR. Many VR users find this technique works well to reduce motion sickness.
Make sure that you have adjusted the headset lenses to match the pupillary distance of your eyes. The Meta Quest 3 has a lens spacing adjustment wheel on the bottom of the headset that accommodates interpupillary distance (IPD) from 53-75 mm. The Meta Quest 2 has three settings for IPD, where you can gently move the headset lenses apart or closer together to try out the two other IPD settings. For more information on IPD in Meta Quest 2, refer to this Meta support article.
Use VR in a well-lit area to avoid disorienting lags in the experience. The sensors in the headset need to see your surroundings in order to properly construct the virtual environment.
Even if you’ve tried VR before and experienced motion sickness, remember that many VR games involve flying, climbing, or teleportation mechanics that can be disorienting for new VR users. VET lessons, however, are all conducted in one stationary virtual room with minimal disorienting movements. Each lesson lasts 10-20 minutes, providing many opportunities for breaks in-between lessons.
How do I connect my headset to Wi-Fi?
To connect your Meta Quest 2 or 3 headset to Wi-Fi:
- Put on your headset.
- Look at the menu at the bottom of your screen. (If the menu isn’t there, press the Oculus Button on the right controller to make the menu appear.)
- Press the “Quick Settings” option on the menu.
- On the new pop-up, press “Wi-Fi”.
- Select your Wi-Fi network.
- Enter your Wi-Fi password and connect!
If you’re still having trouble, you can follow some of the Wi-Fi troubleshooting solutions that Meta suggests here.
Why is my VR experience glitchy and/or lagging?
If you’re experiencing screen lagging in VR, your headset might be running low on power. Double-check your battery level, and recharge the headset if it’s low.
Another solution is to make sure you’re not standing next to a large window that lets in a lot of sunlight. The sensors on the headset are not designed to handle direct sunlight.
Finally, ensure your space is well-lit by its artificial lights. The VR sensors will not work properly in a dark, dimly-lit room.
If you’re still experiencing issues, you can try quitting the VET app and relaunching it, as well as powering down your headset and then turning it back on. Contact us for help if the problem persists.
Why is my VR experience blurry?
Your VR experience is most likely blurry because the headset is not properly fitted on your head. To start, ensure that the headset is snug on your head. Then, try adjusting the headset slightly on your head, moving it up and down, then left and right, to see if that improves the visuals.
You can also try cleaning the headset lenses with a microfiber cloth. Do not use soap or any type of cleaning chemicals to clean the lenses; this will ruin them.
If that doesn’t work, adjust the interpupillary distance (IPD) on your headset. The Meta Quest 3 has a lens spacing adjustment wheel on the bottom of the headset that accommodates interpupillary distance (IPD) from 53-75 mm. The Meta Quest 2 has three settings for IPD, where you can gently move the headset lenses apart or closer together to try out the two other IPD settings. For more information on IPD in Meta Quest 2, refer to this Meta support article.
How should I clean and care for my headset?
To clean your headset lenses, wipe them with a microfiber cloth. Do not use soap or any type of cleaning chemicals to clean the lenses; this will ruin them. For the headset face padding and the controllers, you can use disinfectant wipes to clean the headsets between users.
Another sanitary option to clean VR headsets is purchasing a UV-C headset sterilization box. This box uses ultraviolet grade C directional light to sterilize the headsets placed within them in one minute. You can purchase a UV-C box from a variety of companies on the Internet.
How do I download the Meta app on my phone?
For iPhones, go to the App Store < Search. Then, search “Meta Quest” and download the Meta Quest app.
For Androids, go to the Google Play Store. Then, search “Meta Quest” and install the Meta Quest app.
Once the app is installed, open it on your phone. The app will prompt you to sign in with a Meta account. For more information on setting up a Meta account, refer to Step 01 on this webpage.
VET APP QUESTIONS
What's the difference between the apps VET and IVEE?
Virtual Electrical Training (VET) is our signature virtual reality training program for electrical school apprentices across the United States and Canada. The lessons immerse apprentices into an interactive jobsite where they practice electrical installations and wiring in a safe environment. The app includes four 15-20 minute lessons that can be completed in both Guided Mode and Test Mode. More lessons are currently in development to expand the training to more electrical tasks.
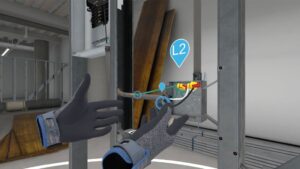
The IDEAL Virtual Electrician Experience (IVEE) is a short VR demo where you can “experience a day in the life of an electrician” while working to repair the wiring on a packaging machine. While it’s not as comprehensive as the VET lessons and is not guided, IVEE is available for free on the App Labs store — part of our mission to encourage interest in the electrical trade and help with future electrician recruitment. Visit the IVEE product page on our website for details on how to download the app.
What is the difference between Guided Mode and Test Mode?
Each VET lesson is available in both Guided Mode and Test Mode. You select your desired mode first on your LMS, and then it will be unlocked on the headset. We recommend that students first learn the lesson tasks in Guided Mode prior to selecting Test Mode.
In Guided Mode, students learn the lesson objectives, which includes best practices and proper techniques to complete the assigned electrical task. They are guided by a detailed voiceover that walks them through every step of the process. The correct tools and equipment are highlighted in each step so students learn what to use to accomplish their goal.
In Test Mode, students test their knowledge by completing the assigned task on their own at their own pace. They receive a percentage grade at the end of the lesson based upon their performance. Both instructors and students also receive a detailed report card in their learning management system.
Why isn't my VET login token appearing?
If you’re using an iPhone or iPad to generate a VET login token, you may need to allow pop-ups on your web browser. On your Apple device, go to Settings > Safari and turn off “Block Pop-Ups”. Once you’ve done so, log back into the LMS and generate another login token. You should now see a token appear on your screen. Please contact us for help if issues persist.
I can't log into VET with the token, what should I do?
First, make sure the token you’re entering into the VET app matches the token in your LMS.
If you are entering the token correctly, make sure your headset is connected to Wi-Fi. Next, try quitting and restarting the app on your headset. Then, try re-entering the token.
If the problem continues, please contact us for additional support.
Why am I on the edge of a boundary when I start a VET lesson, and how can I fix it?
For VET Series 1 Branch Circuit Wiring lessons, we highly recommend using a 10ft x 10ft space for VR in order to avoid boundary issues. However, if you do run into spacing issues and can’t reach certain parts of the VET lesson, it’s easy to fix. To reposition yourself in a VET Branch Circuit Wiring lesson:
Move to the center of your physical space.
Press and hold the Oculus button on your right VR controller for about three seconds.
Once you do this, your view of the VET lesson will recenter.
For VET Series 2 Conduit Bending lessons, only a 3 ft x 3 ft space is necessary thanks to the teleportation feature. To reposition yourself in the lessons, you can use the teleport feature. Push up the right thumbstick on the right controller, aim the teleportation beam at a spot on the floor, and then release the right thumbstick to be teleported to that position.
How many attempts will I get to go through VET's lessons?
The VET software permits an unlimited number of attempts for each student. This allows individual instructors to decide on the number of attempts their students are allowed in their particular class.
How do I submit scores to the LMS?
To submit test mode scores to your instructor:
Finish test mode.
Take off your headset.
Return to your open LMS webpage where you launched VET.
Click the “Display Results” button.
Click the “Submit Results” button.
For additional pictures and instructions on submitting scores, please view this document.
How long does it take to complete a VET lesson?
Each of the lessons differ in length, but in general you can expect them to take 10-20 minutes. The actual time will vary based upon your familiarity with the electrical tasks in the lesson and your comfort with VR.
Can I go through VET lessons on my computer?
No, our virtual reality training is only accessible on the Meta Quest 2 or 3 virtual reality headsets.
How do I make sure the VET app is up-to-date?
Don’t worry- the app will prompt you to update it when an update is available. If there’s no prompt, you can assume your app is the current version.
My headset died during the VET lesson, what do I do?
Unfortunately, the VET app does not save your progress. You will need to charge your headset and re-enter the application to start the lesson again. A Meta Quest 2 takes approximately 2.5 hours to charge, and the charge lasts for roughly 3 hours. A Meta Quest 3 takes approximately 1 hour and 45 minutes to charge, and the charge lasts for roughly 2 hours. If you would like to extend the battery life of the headset, many online retailers offer battery packs and battery-equipped headset straps that can help.
Need additional support?
IVRY Technologies is happy to assist you with any software issues relating to the VET or IVEE apps. However, for hardware issues with your headset or controllers, please contact Meta at https://www.meta.com/help/quest/.
Helpful Meta Resources
If you need additional support with your hardware, please visit Meta's support page.
META VR ACCESSORIES
Elite straps help with headset comfort and battery life.
Charging docks provide rechargeable batteries for your headset and controllers.
Meta Warranty Plus provides two years of enhanced coverage, including accidental damage protection, for your new headset.

@2020 IDEAL INDUSTRIES, INC. ALL RIGHTS RESERVED.